HOW IT WORKS
1
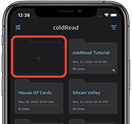
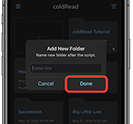
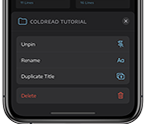
CREATE FOLDER
Tap the + button.
Type or dictate
the scene title.
Tap and hold any folder
to access the folder menu.
2
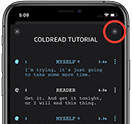
RECORD EACH LINE
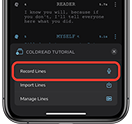
Tap the ... button.
Tap 'Record Lines'. You can also import audio files.
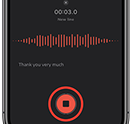
Choose if you'd like your lines transcribed as you speak, then tap the record button.
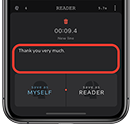
Save the line as 'Myself', if you recorded your character's line, otherwise save it as 'Reader'.
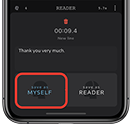
If you mistakenly saved the line as 'Reader', but it was supposed to be 'Myself' - don't worry. It's easy to change it by swiping the line right. To delete it, swipe left.
You can edit the transcription before saving the line. Leave the cue (last word) as it has been transcribed by the app. If you change it, it might not be recognized while rehearsing. E.g. don’t change 'Hailee' to 'Hailey.'
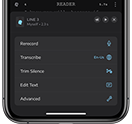
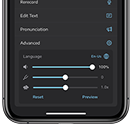
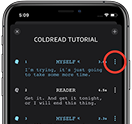
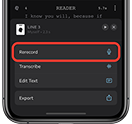
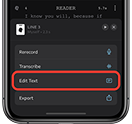
Tap the 3 dots on any line to access the line menu. You can re-record, transcribe, trim, edit text, or access advanced features.
3
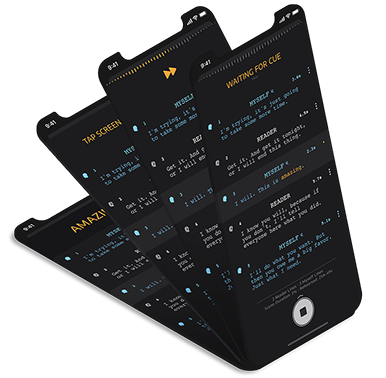
REHEARSE
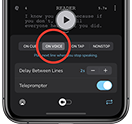
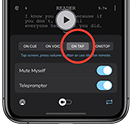
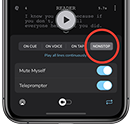
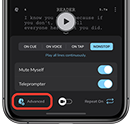
Different ways to rehearse your lines
Swipe up the play button to access menu
'ON CUE' MODE
'ON VOICE' MODE
'ON TAP' MODE
'NON-STOP' MODE
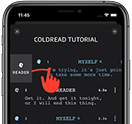
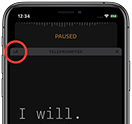
When you say the very last word of your line (the cue), coldRead will “read” the following line back to you, just like a real reader would.
The app detects when you stop speaking and starts timer to next line.
Timer delays next line to allow pauses while speaking.
'Myself' line will stop the playback. Tap anywhere on the screen, press volume-up or use shutter remote (with 2 buttons or more) to play the next line.
Play all the lines
without stopping.
Tap the screen to skip forward. Mute 'Myself' if you'd like to rehearse with no interaction.

LANGUAGES
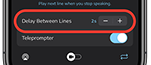
Adjust DELAY
FROM THE TOP
Shutter remote
On-Cue mode supports multiple languages. If your language isn't supported at the moment, use On-Voice mode instead.
Longer timer allows longer pauses while speaking.
Default time is 1 second.
To change, tap - or + button.
To start from-the-top - tap with two fingers anywhere on the screen or double click the button on your remote.
Any shutter remote with support for iOS AND Android (2 or more buttons), or a bluetooth keyboard should work. You can get one on Amazon or eBay.


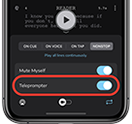
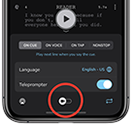
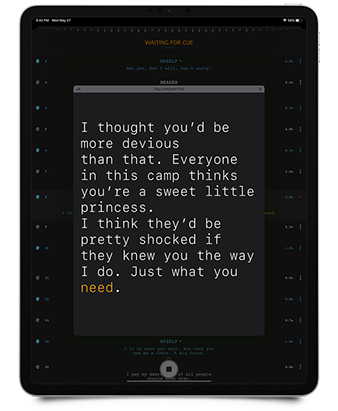
USING BUILT-IN TELEPROMPTER
All rehearsing modes support use of the teleprompter
If turned on, 'Myself' line will trigger the teleprompter and display enlarged text on the screen as you rehearse.
Tap "..." button to open the teleprompter menu. Rehearsing will be paused while you're adjusting the options.
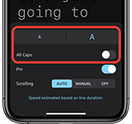
Adjust margins, opacity and font. Mirror screen. Tap anywhere to close the menu.
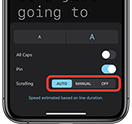
Scrolling can be automatic (speed is calculated from your line duration and font size), or manual (using the slider).
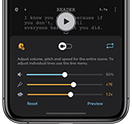
CHANGING PITCH AND/OR SPEED
Control the way your Reader sound and change the playback speed
Swipe up the Play button. Tap on the Reader Advanced button.
Adjust the pitch, speed, and volume for the entire scene.
To adjust individual lines, open the line menu.
EXCHANGING SCENES WITH FRIENDS
Easily share scenes with friends if you prefer not to have you own voice for Reader
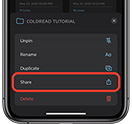
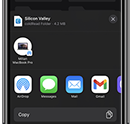
To send - tap and hold the folder you want to share. Tap share.
Send it via AirDrop, messages, or email.
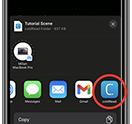
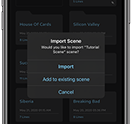
To import - tap on the attachment in your email app. Tap Share and open it with coldRead.
Import it as new or add it to an existing scene.
EDITING LINES
Reorder, delete, transcribe, trim, share, or change cast (switch roles) of multiple lines
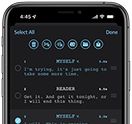
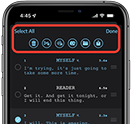
Tap '...' then Edit Lines. Or just tap and hold on any line for a few seconds.
Select all the lines you want to change.
Tap one of the buttons on top. Delete, Transcribe, Trim, Recast, or Share.
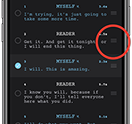
To reorder - tap and hold any line and drag the line by the 3-dashes button up or down.
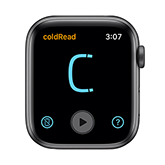
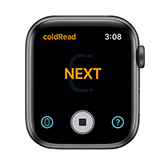
APPLE WATCH REMOTE APP
Control coldRead app with your Apple Watch
Skip the line, start from the top, start and stop the rehearsal.
Remote app is connected only when lines are on the screen.
4
SELF-TAPE
- Swipe up the play button to open the rehearse menu and tap the Camera button.
- Screen will rotate to self-tape mode.
- Choose the self-timer duration.
- Tap the Play button.
- Video recording will start immediately.
- Get ready, and when the countdown is over coldRead will play the first line.
- coldRead will give you a heads up 3 seconds before countdown is up by flashing the camera in the back or flashing the screen red in the front.
- Tap the Stop button when you finish and the save menu will appear.
SAVING YOUR Self-tape
- Since the sound is recorded from your device’s speaker, with the microphone that is right next to it, the 'Reader' lines will sound a little bit distorted. Reduce your device’s volume to have the Reader lines sound softer.
- The save menu will give you an option to export the tape with READER lines sound quality significantly improved. Turn the 'Improve Reader audio' on. All video recordings have a natural background 'hum' noise; to match that noise behind READER lines we have the 'Match Room Ambience' option. It will get a small sample of your background noise and loop it behind READER lines. Test the recorded sample with the Play button. If you hear clicking sound use 2 buttons next to it to move the sample for a fraction of a second left or right. Sometimes it takes more than a few taps to get it to the desired position.
- Connect to a blue-tooth speaker while you rehearse for the most realistic results. Any speaker that is far from your device's mic will record good. If you're using an external speaker turn off the 'Improve Reader audio' and 'Match room ambience' option.

F. A. Q
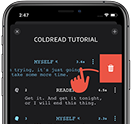
・How do I delete a line?
Swipe any line left and tap delete button.
・How do I reorder my lines?
Tap and hold any line and drag the line by the 3-dashes button (on the right side) up or down.
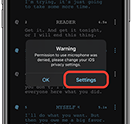
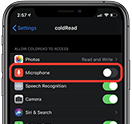
・I accidentally denied coldRead mic/camera/photo library access. How do I fix this?
coldRead will show an alert telling you about permission being denied and will offer an option to change that in your device's settings.
・How do I re-record lines?
If you’d like to re-record audio for an existing line, open the Line Menu and choose Re-Record.
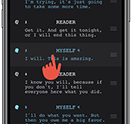
・I saved the line for MYSELF, but actually the line isn’t my character’s. Do I have to delete this line and record it again?
No. Swipe the line right and tap the Reader button. The line will stay the same, but the cast will change from MYSELF to READER.

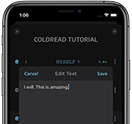
・How do I add text to my line?
Tap the Line Menu and choose Add/Edit Text. Dictate or type your line and tap OK. To delete text, follow the same procedure, but leave the field empty.

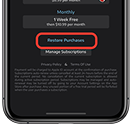
・How do I back up or restore my lines and folders?
Tap Restore or Back Up on the settings screen.
After you tap Back Up, choose where to store the backup file in your iCloud folder. You may lose your data when you restore or when you replace your device. Back up regularly to avoid data loss or to access your data from another device.
After you tap Restore select the backup file from the location in your iCloud folder. You can restore your backed-up data to the original device or to another device of your choice (iPad or iPhone). Restoring from backup will delete your existing folders and lines.
・How do I send or receive lines?
Record your lines preferably in coldRead (Voice Memos work as well but it won’t save the transcription and won’t mark the lines as READER or MYSELF, so you have to do it manually after).
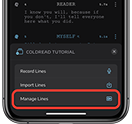
If you are sending lines from coldRead, tap the '+' button and then ‘Manage Lines’ (shortcut is to tap and hold on any line). After that select all the lines you want to send and tap the 'square-arrowUp' button. Choose the way to send them (via AirDrop, mail, SMS, etc.). If you recorded them with Voice Memos, just send the lines from the Voice Memo app the way you prefer.
When you receive the lines (in your email, SMS, etc.), you have 2 options. The first one is to tap on each line and then open it with coldRead app. That's it. The second option is to tap on each line and save it to your iCloud drive (Files). Remember where you save them (the easiest way is to create a new folder). To import lines, open the scene folder in the coldRead app, tap the '+' button, and then ‘Import Lines’. Select the folder where you saved the lines previously. If you’re importing only one line - tap on it. If you are importing multiple lines, tap on the '3 dots' button, then ’Select’. Select all the lines you want to import and tap ‘Open’.
・How do I move my scenes and lines from iPhone to iPad?
Use Back Up and Restore option on the Settings Screen.
Back up your lines to iCloud, remember the location and the name of the backup, then restore them from iCloud to your new device.
・I subscribed but coldRead still won’t let me play more than 8 lines. What do I do?
Make sure you are logged into your App Store account. Try restarting coldRead. Try Restore Purchases button in the settings menu. If that doesn't work, send an email to support@coldreadapp.com.
・How do I cancel my subscription?
Tap Manage under Purchase Screen in Settings. Or go to your device Settings.
- Tap your Apple ID at the top.
- Tap View Apple ID and sign in if prompted.
- Tap Subscriptions.
- Find and tap your coldRead subscription.
- Choose Cancel Subscription
Important: If you don't see the coldRead subscription, make sure that you're signed in with the Apple ID that you used to subscribe originally. Also, review your iTunes purchase history.
・I hear hum/clicking sound on my self-tape!
All video recordings have a natural background 'hum' noise; to match that noise behind READER lines we have the 'Match Room Ambience' option. It will get a small sample of your background noise and loop it behind READER lines. Test the recorded sample with the Play button. If you hear clicking sound use 2 buttons next to it to move the sample for a fraction of a second left or right. Sometimes it takes more than a few taps to get it to the desired position.
You can turn this off before saving your tape to Photos.
Please read 'Saving your self-tape' section on this page.
・Transcribing isn't working. No language model installed.

TIPS